Posted on Leave a comment

Anaesthetics – Where Do Piercers Fit In?

I think one of the most common questions we get, aside from ‘How much is a piercing?’ is… ‘Can you numb it?’ Piercing numbing is a common query.

It’s a fair question. Especially for those inexperienced with piercings, it might feel like a daunting experience! It’s completely understandable that you would want to make it as pain-free as possible. But what kind of piercing numbing is available? And why are they unsafe?

The History of Anaesthetics

Since the dawn of time, for as long as human beings have experienced pain, we have been looking for ways to avoid it. The ancient Babylonians may have been using anaesthetics up to 4,000 years ago. The earliest accounts of anaesthetics pop up in the early 1200s, where physicians would use sponges soaked in opium to relieve the pain of surgery. However, the first general anaesthesia was not implemented in a surgery until October, 1846!

Piercing numbing creams did not become popular in the tattoo and piercing scene until the late 90s and very early 2000s, with the rise of Emla cream. That means that piercing anaesthetic is still very much in it’s infancy.

“Now hold still while I perform your helix piercing…”

Anaesthetics and the Law

It’s very important to stress that piercers are not licensed or insured to provide any anaesthetics, including piercing numbing creams. Numbing creams are licensed, prescription-only medications that require a special license in order to use. Tattooists and piercers who are administering numbing creams to their clients are committing a crime, which can result in fines, jail time, and loss of license.

The administration of local anaesthetic injections by persons other than medically qualified practitioners (doctor/dentist) is illegal, and therefore not permitted. External application of topical anaesthetics (creams/gels/sprays) to clients can be deemed an offence under the Medicines Act 1968. The legislation stipulates that only persons who hold a product licence (generally pharmacists) may supply these products for use in medical applications. Their administration by Body Piercers, Tattooists or Therapists on clients for cosmetic purposes can therefore be deemed an offence.

– Gov.uk

Even with consent from the client, you are reminded that the use of any anaesthetic, be it by oral, injection or topical application, may leave the user open to prosecution under the Medicines Act 1968 or Health & Safety at Work Act 1974.

Piercing Anaesthetics – How Do They Work?

The most common ingredients in numbing creams are lidocaine, benzocaine and prilocaine. These are active ingredients that work by blocking Na+ (Sodium ion) and K+ (Potassium ion) channels in your nerves, preventing them from firing properly. This nerve effect can cause lidocaine toxicity when improperly used – For example, by an unlicensed piercer. Symptoms of lidocaine toxicity include:

  • Heart Palpitations
  • Hypotension
  • Dizziness
  • Shaking and tremors
  • Nausea

Of course, lidocaine toxicity from a piercing would be quite rare, however…

Lidocaine and it’s derivitives are common allergens. 2.5% of people may experience anaphylaxis from the introduction of lidocaine to their bloodstream – And you may not know about this allergy until it is too late.

Aside from anaphylaxis, allergic contact dermatitis and skin irritation are very common. This means that you may experience an angry rash, itching, or bleeding after applying a numbing cream. This can be exacerbated if numbing cream comes into contact with broken skin, such as a body piercing.

Freeze Sprays – A Bad Alternative

Another popular, and equally terrible, piercing numbing option are ‘freeze sprays.’ These are unlicensed, meaning that anyone can use them and it is not classed as an offence. You have probably seen them in youtube videos or instagram reels – They look like they are spraying deodorant onto the piercing spot.

Freeze Sprays work by spraying a liquified gas or chemical onto the skin – This is often ethyl chloride. As the gas evaporates, it rapidly cools the skin until the nerves are no longer able to fire properly. This gives a temporary numbness to the top layer of skin.

These sprays, although legal, are highly problematic. The freezing action can toughen the skin, causing excessive trauma to the piercing site. Secondly, if used on or near mucousal membranes, it can severely damage the skin. Finally, and most importantly, freeze sprays can (and do) cause chemical burns and tissue necrosis. Freeze sprays are unregulated and often used by piercers who have no idea what they are doing. This means that misuse is criminally common.

  • The product itself is not sterile and can therefore potentially cause an infection.
  • To have a good numbing effect, the spray must be applied in quite high doses to reach the nerve fibres below the skin. This presents the likelihood of burns being caused to the skin, particularly in cases of smokers and diabetics, which opens the way for infection.
    • The product has been shown to be a respiratory irritant, particularly when used on or near the face.
  • The product is highly flammable and must therefore be considered carefully in terms of health & safety during usage, storage etc.

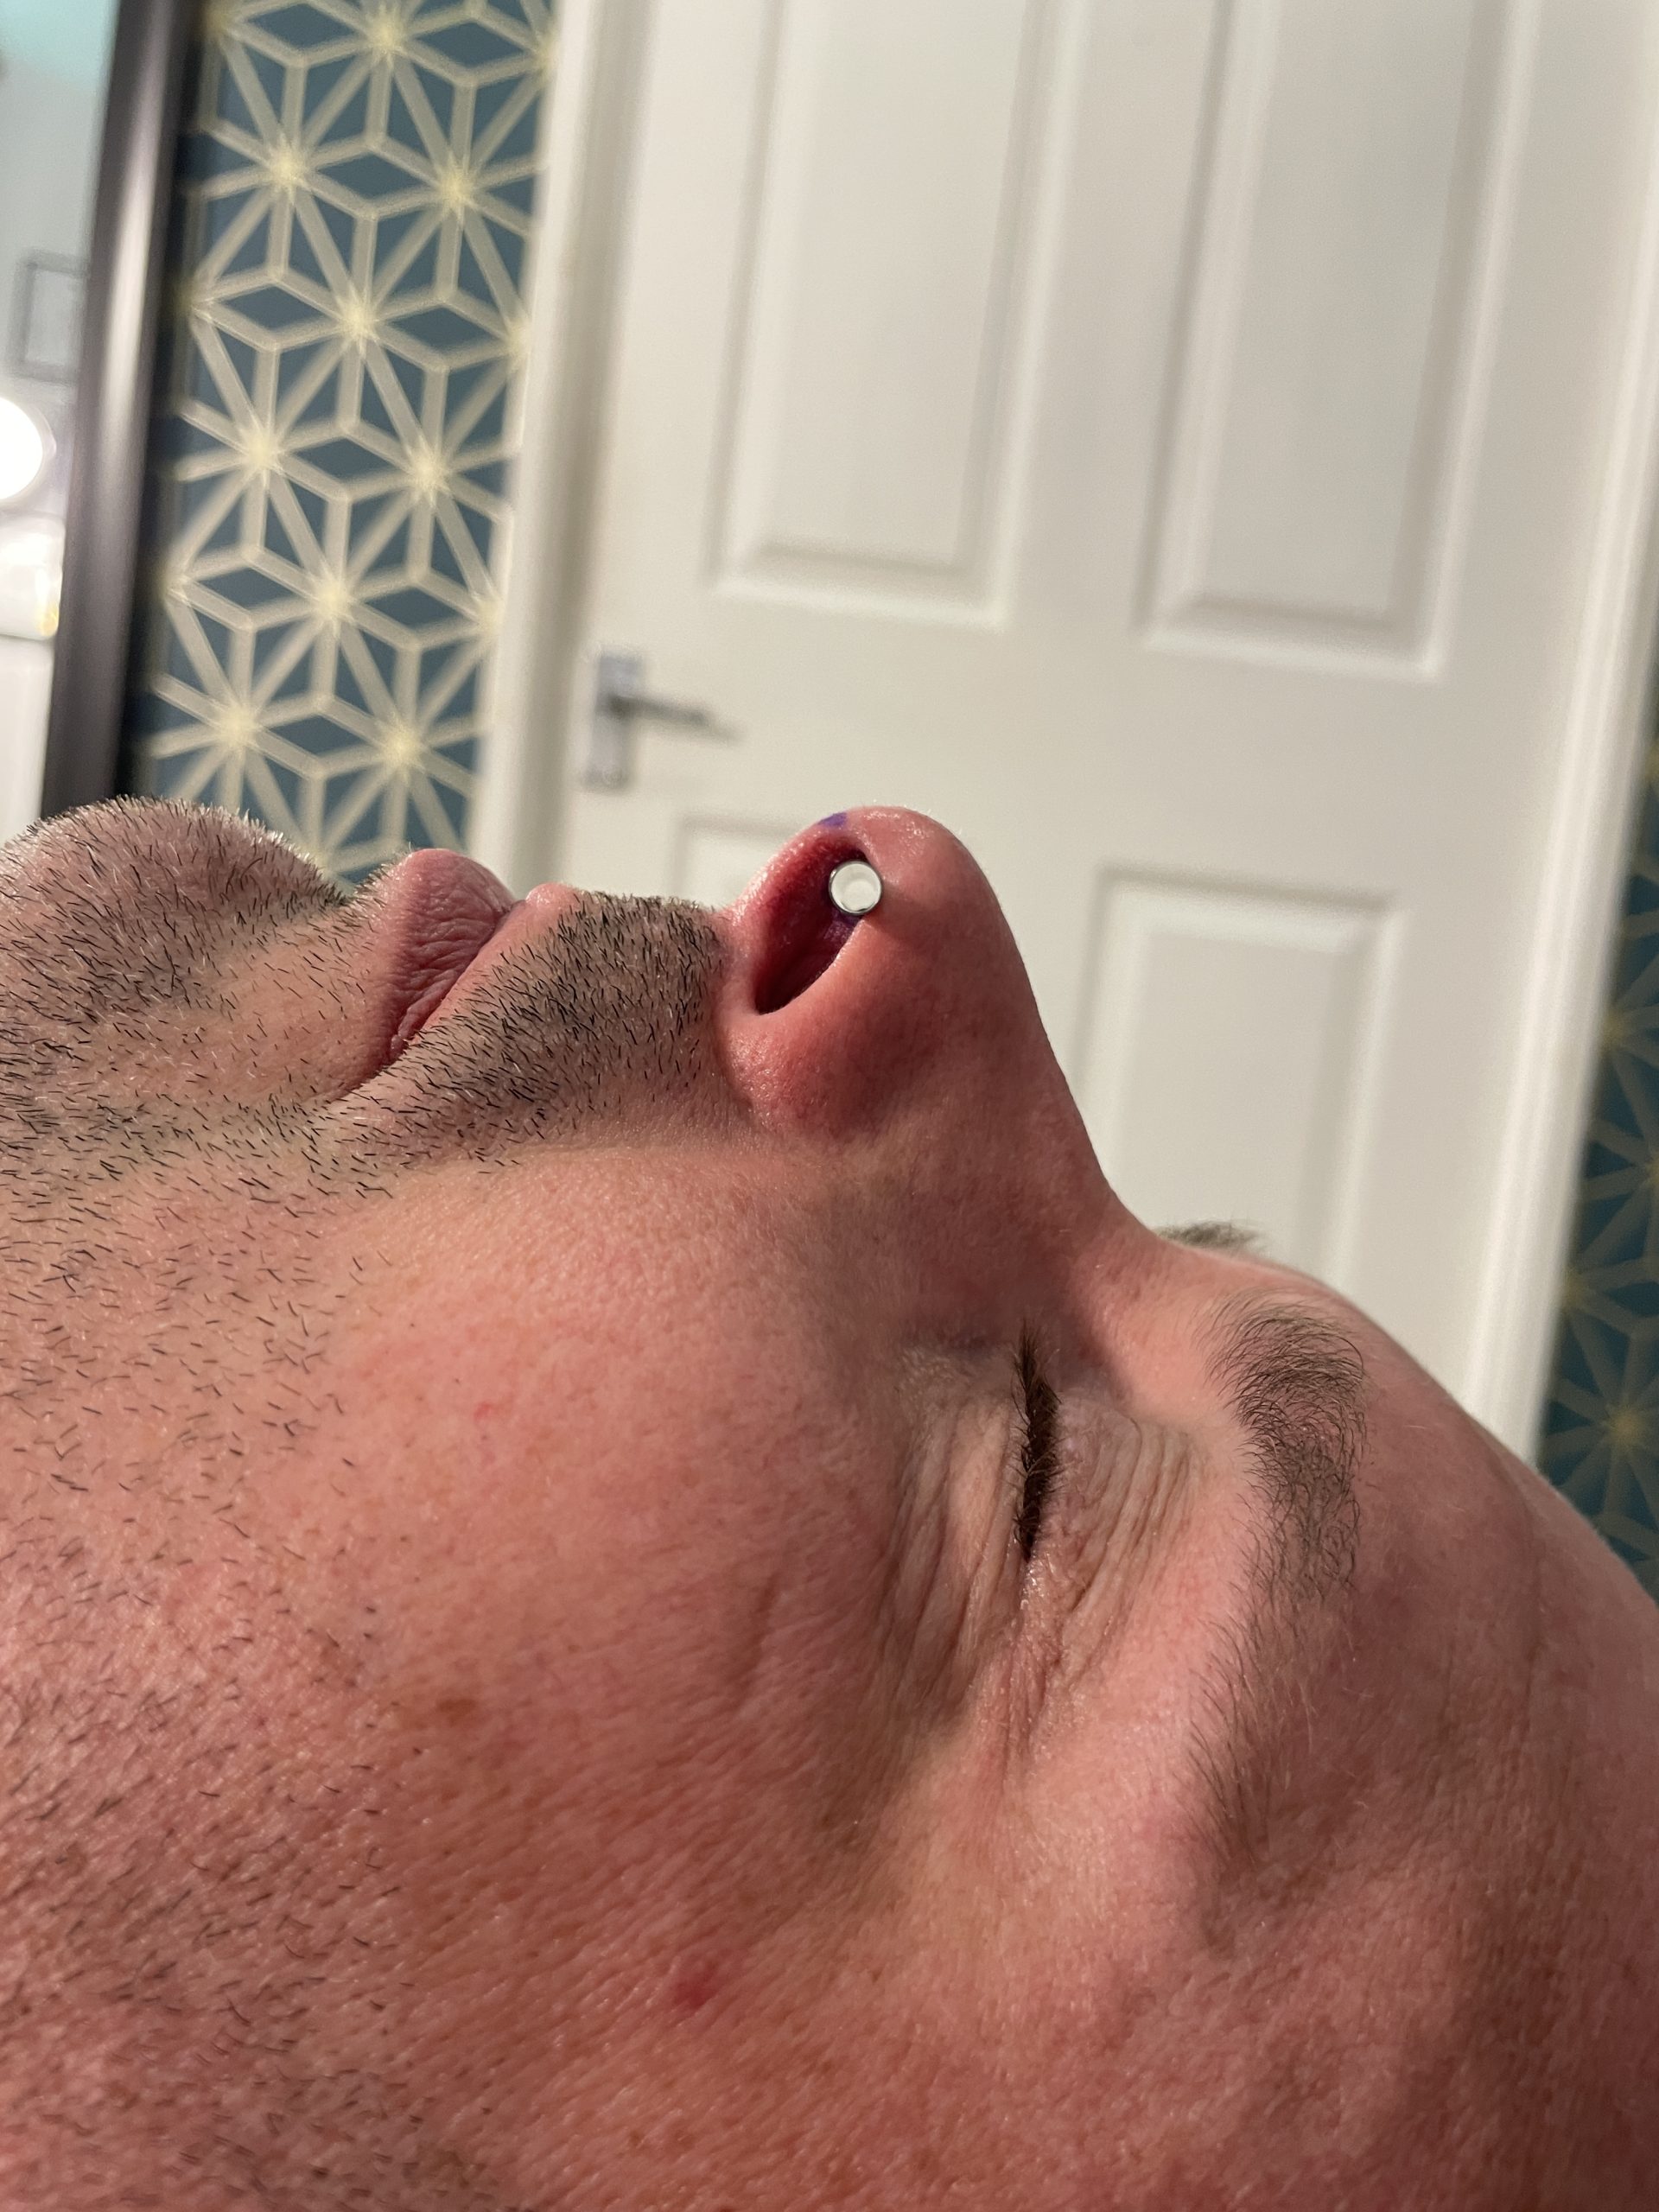
We will attach an image below, taken at Rogue, of a navel piercing that we unfortunately had to remove due to a severe chemical burn from a freeze spray. This was of course not pierced at Rogue.

This client, who has given permission for this image to be shared, had to have their navel piercing removed by ourselves. This piercing was only 6 weeks old, but you can still see the scarring and damaged skin surrounding the navel that was caused by a freeze spray. This is a classic result of a chemical burn caused by a freeze spray. We hope that this piercing will heal, this scar will fade, and next year we will be able to give them the beautiful navel piercing they deserve!

Do They Even Work?

Ironically, even if you do take the risk and apply a numbing cream before a piercing without your piercers knowledge (we do not recommend doing this!!), you would hope that your risk would pay off by giving you the painless piercing you want. You may be disappointed in the results, as numbing creams are ineffective at numbing piercings! Why is this? It is because lidocaine can only act where it is applied, aka the thinnest surface layer of the skin. This means you may only get numbness for the first 0.00001 seconds of a piercing before we are piercing non-numbed skin!

What Should You Do Instead?

There are so many non-anaesthetic options for minimising the discomfort of a piercing.

Accept It.

To a certain extent, we can minimise the pain of a piercing through technique. We minimise the use of tools or clamps, we import the highest quality teflon-coated needles, and pierce using a smooth and gentle technique. That being said, all piercings naturally come with a certain level of discomfort. We are piercing you, after all.

Self Care

If you are stressed, tired, hungry, hungover, or generally not feeling your best, then a piercing is going to feel more uncomfortable. The best way to have the best experience is to look after yourself! Treat your piercing like a medical procedure – Ensure you are well-fed, hydrated, and coming in after a good nights rest. You will be amazed how much basic self-care can make a piercing more manageable.

Breathe It Out.

We are not a hippy studio. We don’t normally subscribe to breathing techniques! However, there is scientific evidence that slow, deep breathing can help patients with acute pain. A total of 11,968 studies were screened in this review, showing that deep breathing techniques significantly lowered pain scores. That is not to be sniffed at! This effect is called Respiratory Hypoalgesia. The baroreceptor system (The sensing system that includes the lungs) detects changes in blood pressure and heart rate during the respiratory cycle. Deep breathing changes the signals that are relayed to the brain by the vagus nerve, which then provides an analgesic effect through the parasympathetic nervous system.

At Rogue, we practice deep breathing techniques before, during, and after the piercing. As a piercee as well as piercers, we can absolutely tell the difference. It is magical.

Conclusions

So there you have it! Anaesthetics may sound like an excellent option, however they are unsafe and ineffective. Please never apply numbing creams without your piercers knowledge, and never attend a piercing studio that offers numbing as they are breaking the law.

Stay safe, stay healthy!

If you have any questions, please drop us an email or instagram message! Keep an eye on our blog as we post a new one every single Friday!

Posted on Leave a comment

Blog Masterpost!

Posted on 1 Comment

Antitragus and Snug Piercings 101

Happy Friday! Today we’ll be taking a closer look at two of the most anatomy-dependent and complicated to heal cartilage piercings in the world – The snug piercing and Antitragus piercings. So what are they? What anatomy are we looking for? Why are they so tricky to heal? And why are they so dang popular?

What is a Snug Piercing? What is an Antitragus Piercing?

Fresh Antitragus Piercing, using an Infinite Body Jewellery curved barbell.

Antitragus piercings are complex cartilage piercings that pass through the ‘ball’ of cartilage that sits opposite to the flat plate of the tragus. These piercings are performed with curved barbells, often with plenty of room to allow for initial swelling as these can swell quite a bit!

Healed Snug piercing wearing a Neometal 16g straight barbell.

Snug piercings are another complex cartilage piercing, that often sit higher up the ear, parallel to the conch. These are pierced through the ridge of cartilage between the conch and outer helix.

The above diagram doesn’t quite do the antitragus and snug anatomy justice, however it is important to know that these are not flat plates of cartilage like the helix, conch, or tragus. The snug and antitragus are actually folds of cartilage with a fluid-filled void in the middle. I recommend you feel your snug and antitragus to see what I mean. Pinch your snug from the front and back, and you should be able to feel the little space in between the fold. Pinch your antitragus from the front and back, and you should be able to feel the squishy void!
This extra anatomy means that technically, these are two conjoined piercings – We are piercing through the front, and back, of the cartilage. This, plus the fluid void, make these extremely difficult to heal.

Snug and Antitragus Anatomy

We often tell clients that these piercings are highly anatomy dependent… But what does that mean? What anatomy are we looking for? Here we will place some photos of ideal, and unsuitable anatomy and explain our reasoning for each.

As snug piercings are a very complex piercing, we only want to perform them on perfect anatomy. There are as many shapes of snug as there are ears on the planet! Even on the same person, one side may be more suitable than the other. So what are we looking for?

Snug piercings require a very sharp, steep ridge. This steepness means that there is not a huge void between the two cartilage plates. The smaller the void, the easier your healing process. The ridge needs to be well-defined, so that the jewellery has only a short distance to clear. Finally, there needs to be good room either side of the ridge to support the jewellery. Some people have very tight outer helix ridges, which would compress the jewellery and minimise the chances of a good heal.

We are looking for similar things when it comes to antitragus piercings! Again, we need a sharp, well-defined ridge to support jewellery. The sharper and thinner the antitragus ball is, the smaller the fluid void and the easier your healing process is going to be.

There are as many examples of perfect and imperfect anatomy as there are ears on the planet, so please always have your anatomy checked by a trained professional piercer!

Antitragus and Snug Piercing Aftercare

  • Clean piercing twice daily with sterile saline.
  • TO CLEAN: First, wash hands with antibacterial soap and water. Spray a small amount of sterile saline onto both the front and back of your antitragus or snug piercing to soak and soften crusties. Use a piece of non-woven gauze or clean, folded kitchen roll to gently remove any debris. Once the piercing is clean, gently dab away any remaining moisture.
  • Do not use any extra products, homemade remedies or chemicals.
  • Do not twist, turn or fiddle with your jewellery! This introduces bacteria, damages the healing piercing and can extend your healing time.
  • Do not soak or submerge your piercing in the first 4 weeks. This means you must avoid swimming, bathing in bathtubs, hot tubs, saunas etc. Please keep this in mind when booking your appointments.
  • Please follow downsize instructions and book a checkup when your snug or antitragus piercing is 4-6 weeks old.
  • If you’re unsure or have questions at any stage, then please don’t hesitate to contact us! We’re more than happy to help. Contact us via email or through our instagram.

Snug and antitragus piercings are reknowned for experiencing heavy swells during their first few weeks of life. This is because the void between the two cartilage folds can fill with more fluid during the initial swell, and this fluid takes a long time to drain away! This means that the initial swell can be a little more excessive, and take longer to go down than other piercings.

This also means that you may be pierced with what looks like a silly-long curved barbell! Do not fret, this additional length is necessary to accommodate that initial swelling phase. We strongly recommend downsizing as soon as possible, as snug and antitragus piercings are quite fragile and are more susceptible to damage caused by snags and knocks. Your new snug or antitragus may require more than one downsize, as the swelling take take a longer time to fully diminish and it is impractical to wait until the full swelling is gone before downsizing. It’s highly likely that you can cause a new swell by not having the intermediate downsizes!

Snug and Antitragus piercings can take as long as 12-18 months to fully heal, however they should be comfortable and unproblematic on a daily basis after 6 months.

The Takeaway

The main takeaway is that these are not beginner piercings! They can take a long time to heal, and can be fairly problematic when fresh. That being said, if you have already had a few cartilage piercings and have healed them well, then we would say that a snug or antitragus is definitely within your skill set to heal!

Always, always book in for an anatomy check with a reputable, skilled piercer before getting these piercings! As they are more challenging to heal, it’s super important that you start off on the right foot by having good anatomy for the piercing.

If you have any questions about antitragus or snug piercings, please don’t hesitate to get in touch with us via instagram or email!

Posted on Leave a comment

Piercings and School

It’s the middle of September, and in the UK that means that people of all ages are returning to their classrooms for a new school year. That also means that a lot of new piercings are entering the education system! So, what are the main topics that we need to cover today?

Many parents and young people choose to get piercings over the long summer break. We performed many hundreds of ‘first’ piercings, and added to the collections of many piercing enthusiasts as well! However, depending on your school, Sixth Form, or College, there can be trouble ahead…

At Rogue, we always advise parents and young people to research the policies of their school to make sure that the piercings that they want are allowed. There is nothing more disappointing for everybody involved than a perfect piercing that needs to be removed due to school! 

So, what do you need to consider? How can we ensure that you or your child can continue to wear their new piercings whilst being mindful of school rules?

Double Lobe Piercings

School Policies

As much as we dislike the idea of your school dictating your personal style, these policies generally don’t come out of nowhere. While researching this blog, I read dozens of school policies and found that they generally boil down to three risks:

1. Risks to health: The risks to health are entirely associated with the individual concerned, these being infection and blood-borne diseases, for example, hepatitis, HIV, AIDS. If good personal hygiene practice is not adopted, then the risk of ill health to the individual concerns is significant.

2. Potential injury: Further injury due to inadvertent contact of the jewellery with other persons, clothing, fixtures and fittings, and so on. The extent of any injury is likely to be minor and would usually comprise tearing of the flesh. The risk is deemed to be greater if rings or projecting items are used.

3. Risks to others: The risks to health and safety of other persons not subjecting themselves to body piercing are low, with the exception of PE, where injury could occur to others who come into contact with other person’s jewellery.

Reading those three risks, you can understand that the risks of body piercing, when performed by an experienced studio using high quality materials, are very low. However, most schools are very risk-averse as they are caring for the children of others. This makes them very liable! So, it is really important to read the policies of your child’s school to ensure that you can follow them.

Removing Piercings for School

Most school policies dictate that jewellery must be removable, and should indeed be removed for PE. The vast majority of schools appear to believe that piercings performed at the beginning of the school holidays will be healed enough to be removed for PE after just 6 weeks. If you have ever attended a piercing appointment at Rogue, you will know that a 6 week old piercing is still incredibly fresh and should not be removed under any circumstances! 

We do not recommend removing any piercing for any period of time until they are fully healed. This can take upwards of 4-6 months in total! 

When a piercing is still healing, the piercing channel only consists of very thin and highly fragile skin. This can be easily damaged, especially if your child is putting their own jewellery back in themselves. Piercings can also close very quickly before they are healed and there is a chance that if jewellery is removed even for an hour or two, it will be gone!

During the months following the return to schools, we do see an uptick in young people with very irritated piercings. This is often due to schools dictating that piercings are removed and reinserted multiple times a week before they are healed. It’s really important to discuss this with your child’s school, and see if a compromise can be found where jewellery can be left in permanently.

Jewellery Choices

If your school is particularly difficult about piercings, we recommend choosing jewellery that is understated and minimalistic. If they are likely to raise an issue over a nose piercing, maybe it is not the best choice to pick a 4mm Swarovski Crystal… 

Most schools dictate that the jewellery be a stud, and be relatively subtle. 

The most popular jewellery we use in initial piercings for young people are the Infinite Prong-set Swarovski Crystals, the Anatometal Tri-beads, the Inari Organics Synthetic Opals, and the Neometal Cluster Ranges. These are both affordable, and quite subtle! 

Retainers

Some schools will recommend the use of skin-toned retainers to minimise the appearance of piercings. This can indeed be a really good option for many students who are unable to remove their still-healing piercings. However, there are many things to consider when choosing a retainer. 

The vast majority of retainers are manufactured from unsafe plastic materials, which can cause irritation in fresh piercings. We do not recommend using plastic retainers such as Bioflex. We stock a wide range of Glass Retainers, which are designed to be discreet. Glass is a highly biocompatible material, so is excellent for use in retaining piercings. You can read all about retainers here! 

Glass Retainers are so subtle!

The Takeaways

It seems like getting piercings while still at school is a minefield! Don’t fret. There are many ways to work with your school to ensure that your piercings stay happy and healthy. 

The most important thing to do is to read your school’s piercing policies. If they have a blanket ban on facial piercings, it is probably worth waiting until you are no longer at that school before getting your nose pierced! 

Secondly, it is vital to know that piercings should not be removed for 4-6 months after being pierced. Removal and reinsertion whilst still healing can cause discomfort, irritation, and potentially extend the healing time. Find a compromise with your school to minimise this risk. 

And finally, enjoy your piercings! Yes, getting piercings while still at school can be annoying, but self-expression is the most important thing. If you do your research and plan carefully, you can still heal a piercing that will last a lifetime and look brilliant the whole time.

If you have any questions, just get in touch with us! Make sure to follow us on social media to stay up-to-date with all of our work.

Posted on Leave a comment

The Current State of Apprenticeships

We are not currently offering a piercing apprenticeship at Rogue. Please do not contact us to ask for one!

If you know anything about Rogue, you know we love a bit of data! Over the past 8 weeks, we have sent out a survey to over a hundred international piercers to fill out in order to gather data on the current state of piercing apprenticeships.

We all know that there are very few piercing apprenticeships being offered internationally – But why is a very big question! We don’t like to just give people a flat no, and we think its important that would-be apprentices know what they’re up against if they want a great start into the industry.

The vast majority of responses were from the USA and the UK.

Of all the responses from the questionnaire, a huge proportion of piercers are active within the UK and USA. This means that any data collected will the skewed towards a more eurocentric response!

A large proportion of respondees have been piercing for close to a decade.

Most of the responses came from experienced piercers with close to, or over a decade of, professional experience. This means that the data comes from a place of knowledge.

We can agree that there are not enough high quality apprenticeships to go around!

This is where it gets interesting. Of the respondants, over 3/4 believe that there are not currently enough high-quality piercers offering apprenticeships to train the next generation. So… Why is that? The following questions were designed to ask why particular piercers, even those with over a decade of experience, do not take on an apprentice.

Despite a resounding cry for high-quality apprentices, with over 75% of responses saying that not enough apprentices are being trained, only 8.7% are currently looking to take one on!

Interestingly, 20% of the piercers who responded stated they would never take on an apprentice. The majority were planning on taking an apprentice sometime in the future – Within 5 years. This is really heartening to know! Even if the current climate is difficult, there is still hope for the future.

This is where it gets interesting. We asked why piercers weren’t taking on an apprentice, and the results were surprising! Very few simply didn’t fancy taking on an apprentice. Most were interested in taking on an apprentice in the future, however due to personal, experience, or financial reasons were unable to.

Some of the responses were:

  • “There currently isn’t enough work for us to justify taking on another piercer – plus, training can be super exhausting.”
  • “I hate 99% of people and couldnt imagine working with anyone.”
  • “We only train piercers when we are looking for new staff and can offer a job at the end of the apprenticeship. I think there’s too many people willing to train up people and then they’re left with no career at the end of it.”
  • “I don’t have enough of a consistent work load to be able to offer a full time position to someone once they have completed an apprenticeship. I could really use a second piercer for a few months of the year when it is the busy summer season but other than that my workload is really slow paced. I don’t think it would be fair of me to take on an apprentice for a few years then not have work for them to be able to support themselves at the end of it. It wouldn’t really be financially viable for me either.”
  • “My Studio isn’t up to standard.”

These are all really valid reasons not to take on a piercer. As much as we stress researching your potential mentor and making sure they are experienced enough to teach you, its also really important to remember that piercers are only human. Piercing is a business. Taking on an apprentice is often a huge financial risk, and to do so ethically requires a lot of forethought and financial planning.

Employment and business structure is a huge reason why many piercers don’t take on an apprentice. Of over 100 piercers, almost half are employed by another person. This means that frequently the decision to take on an apprentice is out of their hands. Even if they wanted to take on an apprentice, their boss may choose not to for a number of reasons.

And again on the other hand, if a piercer is self-employed, they may struggle to finance a piercing apprenticeship. Especially in the current economic climate, many self-employed folks are feeling the squeeze. They are not paid a set wage each month, rather are often paid a proportion of any turnover. Splitting that money with another person may not be financially viable. Even if an apprenticeship is unpaid, many apprentices will still cost the business money in one way or another.

Something that came up a lot in this questionnaire, and in further dialogue with individual piercers, is the concept of ‘The Blind Leading the Blind.’ Given the boom in piercing over the last few years, many people joined the industry in a short space of time. A huge proportion of would-be mentors are still in the infancy of their careers themselves, and are passing down their bad education or bad habits without even knowing it. In addition to this, younger piercers are less likely to have the experience and skill to teach the vital ‘unusual’ piercings, like genital work, large-gauge piercings, and surface piercings. This means that over time, these skills can very easily be lost and die out. We are already experiencing this as it is!

Something to consider as well is the Dunning-Kruger effect. In our experience, younger piercers are more likely to consider themselves ready to teach well before they are ready because they simply don’t know what they don’t know yet. This is why we recommend considering both the portfolio of your potential mentor and the years they have served. A healthy mix of both is ideal. The majority of responses to the questionnaires recommended a mentor should have at least 4-10 years of experience before taking on an apprentice. Here at Rogue, we sit in the decade club where we believe that a solid 10 years of piercing experience makes for a much better educator. Mature piercers will often have travelled and attended conferences, and have excellent links within the industry. It’s often not what you know, but who you know that can allow your career to take off!

Final Thoughts from the Piercers

Here we choose to share some of the thoughts of the piercers interviewed, in order for you to see exactly what they are thinking when they think of a piercing apprenticeship.

  • “I feel it (whether they take an apprentice on or not) depends how the piercing apprenticeship is approached. I had never considered teaching someone. My soon-to-be apprentice has been working with us for 2 years as Saturday help & Receptionist. She has always wanted to learn and we became friends over the past couple of years and so I started to consider helping her. She will continue to work in the studio to earn a wage. To start with I will be training her out of hours meaning she won’t be paid but neither will I. It’s all about both putting in the time. Once she starts piercing, however long that may take I would offer her a portion of the total. We will then continue on from there to ensure that she is well looked after and gets every bit of experience she needs of the next few years.”

  • “I wish more reputable piercers were taking apprentices. We are lacking a quantity of reputable piercers, my studio is currently looking for one but we haven’t found anyone just yet who fits our criteria but quite a lot of half trained people who either had poor, unfinished apprenticeships or they did a piercing course.”

  • “Safe and ethical apprenticeships are key, and not every apprenticeship is effective or healthy. After meeting an apprentice at another studio near me, it feels important to bring up that there are apprentices in some studios that have fulfilled their training requirements in unpaid positions, who are manipulated into thinking that they still must work for free. Apprenticeships are the most effective way for someone to learn our trade and it is unfortunate that some abusers use the dynamic of piercing apprenticeship to lure and trap their victims.”

  • The biggest issue I see here in our industry is that being a good piercer does not make you a good teacher or mentor (same with business ownership). All too often I see these roles interchangeable – where they are each in their own right, different skillsets. I’m not about gatekeepers whatsoever and am a firm believer in paying it forward, it does however need to make good financial sense for a studio but also the potential mentor needs to have good training skills (as well of course as being a good piercer). The other issue I see a lot of is students teaching students – basic fundamentals that mentors don’t have down, yet are passing these gaps in knowledge down to the newer generation.”

Piercing Apprenticeship Conclusions

That’s a tonne of data and industry information! We genuinely believe that there is hope for the piercing industry if we just pull ourselves together and take the jump. Taking on an apprentice is often terrifying, both for the mentor and learner. It’s a big commitment for everyone involved, and there is no way to predict the outcome. A mentorship is based on mutual trust, respect, and often deep friendship. Having an apprentice can feel sometimes like adopting a child! Not only does your mentor shape your piercing skills, but they will shape your attitude and relationship with the industry. Your mentors reputation can often follow you for the lifetime of your career.

So, what do piercers want would-be apprentices to know? I think the main takeaway is that piercers are human beings. We are just as prone to bias, issues and mistakes as the rest of the population. It’s very easy to see piercers on social media as ultra-cool aliens or internet personalities, but at the end of the day we run small businesses and are often sleep deprived and stressed!

The number one thing that we need to stress is this: We get dozens of messages and emails a week from would-be apprentices asking if we are taking on an apprentice and if they can come and do a piercing apprenticeship with us. Sometimes these emails are really polite, sometimes they are straight-up demanding! Especially if you have read through this blog, you will understand how much we care about our industry and how high-stakes taking on an apprentice is. The number one way to get blacklisted by a studio is to send unwarranted, demanding messages asking for an apprenticeship. No high quality studio will take on an apprentice via DM. We need to know you as a person! You can read more about apprenticeships on our dedicated ‘Apprenticeships’ blog category. The blog ‘So You Want To Be a Piercer?’ will also make for great reading. We aren’t saying that you have to come and get pierced every week for three years, or spend £xxxx amount of money with us to ‘earn’ your apprenticeship, but building a relationship with a studio is key. It often can’t be forced, either. You can’t push a friendship and expect an piercing apprenticeship to fall out the other end, y’know? Body piercing is often seen as a ‘casual’ industry, where you don’t need to follow the standard rules of employment. What other industry would you expect to enter via DM? The general opinion is that people who DM studios for apprenticeships are not taking it seriously, and don’t have the professionalism to make it in the industry. Don’t fall foul of this social faux pas.

If you have had a response from a studio when you’ve cold-messaged them on instagram, take a moment to consider what kind of situation you might be putting yourself into. You don’t know them, they don’t know you. Oftentimes they will just be looking for a couple of months of free labour and you will leave with nothing.

So there you have it! Some more thoughts on the piercing apprenticeship, backed up with some decent data. If you’d like to read more on the subject, we have plenty of blogs covering all kinds of topics so just hit the link above to go have a deep dive! If you have any questions, you’re welcome to drop us an email. Make sure to follow us on instagram! And final reminder…

We are not currently looking to take on an apprentice at Rogue. Please do not contact us to ask for one!

Posted on 2 Comments

Large-Gauge Piercings 101

Rogue has become quite the hub for large-gauge piercing work in the UK! With a combined experience of over 30 years, the piercing team at Rogue can offer pretty much all body piercings at a larger gauge than standard. So, what is a large-gauge piercing and how do we do them?

What is a Large-Gauge Piercing?

We define large-gauge as anything pierced initially at 10g (2.4mm) or higher. Large-gauge piercings can also be achieved via stretching, however this is a much longer and more labourious process that can take many years to achieve.

Most piercings can be performed at a large gauge, the most popular being:

  • Lobe Piercings
  • Septum Piercings
  • Lip Piercings (Labret, Philtrum, Snakebites and many more)
  • Genital Piercings
  • Cartilage Piercings (Conch, Helix, and Daith)
  • Nipple Piercings
  • Navel Piercings
Fresh 6mm septum piercing – Note that no tissue is being removed!

What is the process?

We always recommend booking in for a piercing consultation before any large-gauge work – This is for two reasons.

  1. Depending on the piercing, we need to perform an anatomy check. This is done to ensure you have the appropriate anatomy for the piercing you would like, and to double-check that your intended piercing size is suitable.
  2. We also like to talk to our large-gauge piercing clients in advance, as there are sometimes multiple methods available for some piercings. In addition, we always want to talk to our potential clients about what to expect, and ensure that you are ready to choose a large-gauge piercing.
The process of a large gauge navel piercing by Aiden.

How is a Large-Gauge Piercing Done?

Large-gauge piercings are performed the same as most other piercings – We simply use a larger needle, and custom-made jewellery. As previously mentioned, there are sometimes alternative methods available which can be discussed.

  1. To prepare for your appointment, we recommend eating a good meal with complex carbs and protein involved. We also strongly discourage drinking alcohol for 24/48hrs before your appointment.
  2. At your appointment, we will firstly double-check the anatomy and decide on an appropriate placement for you. Depending on the piercing location, we will also discuss this placement with you. Some piercings have ‘wiggle-room’ for placement, such as conch piercings, whereas others really require precise placement. We are happy to chat about this with you to make sure you’re happy!
  3. We will then clean the piercing placement again. We use a double-cleaning method to first clean and secondly disinfect the location.
  4. We usually pierce you laying down – This ensures your comfort and prevents extra movement. It’s also good for clients who might feel a little faint due to the piercing process!
  5. Once we are happy with the marking, we will don our sterile gloves. We use sterile gloves for all piercing procedures for optimal hygeine and cleanliness.
  6. We may then take a short time to decide on our positioning, so there may be a short 2-3 minute wait while we prepare ourselves to pierce. This is to ensure the piercing itself is the quickest, smoothest process.
  7. Once we are ready, and you are ready, we will instruct you to take a nice deep breath in. On your exhale, this is when we will pierce you!
  8. It is super important to keep your breathing relaxed and even. Holding your breath and clenching your torso can only make the process feel more intense and increase any feelings of panic. Nice, even, deep breathing is key.
  9. Once the piercing is performed, we then insert the jewellery. The entire piercing process itself will take less than a minute.
  10. You are more than welcome to take a break at this stage – There is no rush to jump off the piercing bed and take a look! We will always move at your pace.

Large-Gauge FAQs

Why Pierce and not Stretch?

This is a super common question we get! There are two main reasons that you might want to pierce (or repierce) at a larger gauge instead of simply stretching a standard gauge piercing.

Firstly, it can expedite the process and allow you to get to your goal size a lot faster. For example, if your end goal is an 8g septum piercing, that might take upwards of 2-3 years to achieve by stretching a 16g piercing. That’s 6 months post-piercing before you can make your first stretch, and then 2 years of stretching a single size at a time with the recommended 6 month wait time in between. You can read more about septum stretching in more detail here. This is a very long time indeed! That time can be shortened significantly if you choose to get pierced at 8g – You are immedietely at your goal size.

Secondly, it is less traumatic to your body. This may seem counterintuitive, but I hope I can explain this fully! Each time you stretch a piercing, even if you do so under ideal conditions using perfect technique, you can cause the generation of scar tissue. This scar tissue is a lot less elastic than normal tissue, and we need to wait for this scar tissue to soften before you make your next stretch. This is one of the reasons why you need to take stretching really slowly. That being said, even if you wait forever, some scar tissue will still remain from your previous stretches, and this can begin to accumulate. The maximum size that your body can accomodate will depend massively on the amount of scar tissue you generate during your stretching process – After a certain point, your scar tissue will not allow you to stretch to a larger size without damage occuring. If you simply got pierced at a larger size, you can avoid the scar tissue that would have otherwise been generated during the stretching process. For example, if your goal size for your earlobes is 1/2″ (approx 12mm), that is usually 12 stretches that you will need to do. 18g to 16g, 16g to 14g, 14g to 12g and so on. That is 12 opportunities for scar tissue development, even under ideal conditions. And who among us can claim to have always stretched their piercings absolutely faultlessly? Very few indeed. So, if your goal is 1/2″, you can skip 50% of the stretching process by getting pierced at 6mm (2g). This means that a) Your stretching process is shorter and b) You will usually end up with healthier, happier earlobes at the end.

Thirdly, (I know I only said two, but here we are), piercing at or near your goal size allows you to control the final look and placement of your piercing a lot more. When you stretch, you are naturally causing the distortion of tissue. Inserting larger jewellery forces the tissue around it to move and adapt. Over time, especially in body piercings such as navels and nipples, this can sometimes result in thinning tissue or a wonky piercing. Getting pierced at a larger gauge minimises issues with migration, and can prevent a ‘stretched out’ look. This can be especially important to consider in oral piercings like labret piercings, where some people do (and others really don’t!) want the super stretched up distorted look.

A final addition to this answer would be a financial one! Stretching piercings, especially genital or other body piercings, can be expensive. You will usually be expected to purchase multiple sets of jewellery that you will be wearing for a relatively short time before discarding. If doing this properly and wearing high quality jewellery, this can easily cost many hundreds of pounds. Getting pierced at or near your goal size will save you a heck of a lot of money, and who doesn’t appreciate that!

Where Does the Tissue Go?

A classic question! Many people are under the impression that needles remove tissue. So, when you push the needle through, there is a little chunk of flesh on the inside that is no longer a part of your body. Nobody likes a flesh thief! However, this is absolutely untrue and is a bit of a classic piercing myth. So, what happens when you get pierced with a needle? This short video gives you a good idea of what happens.

Does it Hurt More?

Excellent question! Having experienced large-gauge piercings, performed many hundreds, and worked alongside them for many years, we can confidently say that they are never as intimidating as you are expecting. Yes, they can feel a little pinchier than a standard piercing, but they are performed just as quickly and leave no long-term discomfort. They often heal better than standard gauge piercings, too!

I have an existing piercing. Can I be repierced at a larger gauge?

Yes, you totally can! What you need to do to prepare depends on the piercing location and the method by which we repierce you. As a general rule, we usually recommend removing your existing piercing, and waiting at least 12 weeks before booking in for your large-gauge piercing.

Repiercing hurts no more than an initial piercing, and the healing time is not usually extended by doing so.

How Long Do They Take to Heal?

This really depends on the placement. That being said, most large-gauge piercings only take about 10-15% longer than a standard piercing to heal. So for example, if a standard lobe takes 6 months, then a large-gauge lobe will take 7 months. This varies from person to person, but they are not going to take years and years!

Conclusion

Large gauge piercings can be a really, really useful tool in your piercing toolbox. Sometimes they are the only way forward (such as in most genital work), or they can be an excellent option depending on your piercing goals!

The most important thing to know is that you have a lifetime of support from the team at Rogue. We are large-gauge and genital specialists, meaning that we always have a member of the team on hand every day of the week to answer your questions. Don’t hesitate to get in touch via instagram or email, and make sure to head to our booking system to get booked in for your next piercing project!

Posted on 1 Comment

Aftercare 101 – Frenum, Lorum, Hafada and Guiche

Shaft and scrotum piercings are some of the easiest piercings to heal. These pass through just the skin on the shaft or tissue of the scrotum! They are often pierced in pairs or multiples, although you can choose to just do one. Today we focus on the frenum piercing, lorum, hafada and guiche piercings.

Depending on placement, these piercings either wear a BCR ring, straight or curved barbell. These can feel a little larger to begin with, however you can downsize the length or diameter of the jewellery once they have settled down and are happily healing. The frenum piercing in particular is super easy!

Frenum Piercing

What To Expect After Your Piercing

Bleeding – These piercings are the least common male intimate piercings to bleed – This is because they simply pass through tissue and shouldn’t be impacted by larger blood vessels or the corpus cavernosum. The frenum piercing is the easiest.

Urination – As with the bleeding, these shouldn’t impact on your urination! We always recommend drinking plenty of water and staying healthy and hydrated however this shouldn’t cause any problems or discomfort during your healing period.

Adrenaline – Having a rush of adrenaline is part and parcel of having any piercing, but this rush can be a little bit more intense with intimate work. We always recommend leaving your schedule free for the day of your piercing, so that you can take your time and take any rest you might need. You may feel a little tired or drained afterwards – Make sure to bring a carby, sugary snack and a sugary drink to sip on after your piercing.

Shaft and Scrotum Piercing Cleaning

You need to clean your new piercing 2-3 times a day for the first 4 weeks. We recommend a sterile saline spray such as Neilmed.

To clean your piercing, first wash your hands!

Spray a small amount of saline onto the entrance and exit points of your new piercing, and allow this to soak in for 30-60 seconds to soften any crusties.

Once any crusties are nice and soft, gently remove them with a clean piece of paper towel or kitchen roll.

After the piercing is clean, simply dab it dry with more paper towel.

Keeping the Piercing Dry

We recommend avoiding soaking and submerging the piercing in still or stagnant water for 4 weeks after getting pierced. This means no swimming in pools or the ocean, bathing in bathtubs, or other water-based activities.

It is highly recommended you shower as normal – Clean running water is a great way to rinse away any buildup in a very gentle way. The only thing to keep in mind is that you want to avoid any harsh or strongly scented shower gels – These can cause irritation.

When you are finished in the shower, it is best practice to dry the piercing site with paper towel. Avoid the area with your bath towel – Snagging the jewellery on a fresh piercing is not fun!

Did you know that a single litre of pool or sea water can contain up to 1 million bacterial cells?

Leave It Alone!

This rule is the cover-all that prevents undue damage to your new piercing.

Clothing, Lifestyle and Bad Habits

  1. Do not touch, fiddle with, or twist the jewellery.
  2. Do not pick at, itch or scratch the piercing!
  3. Wear loose, comfortable underwear and outer clothing. You may want to change your underwear twice a day for the first week to maintain extra cleanliness.
  4. Do not touch your piercing with dirty hands!

Sex and Masturbation

In order to heal well and last a lifetime, it is vital to avoid mistreating your new piercing in its first few weeks of life. Even if the piercing feels good and comfortable, it is not fully healed yet! Having sex or masturbating can cause serious damage to the piercing.

Do not have sex or masturbate for at least 4 weeks after getting pierced.

After four weeks, you may feel comfortable and ready to have sex. Please, take it slow. Wash your hands. Wear a condom to prevent sharing body fluids, and listen to your body. If it hurts or is uncomfortable in any way – Stop!

And most importantly… COMMUNICATE WITH YOUR PARTNER(S). What might feel good for you might not feel good for them, and vice versa. Be a considerate partner.

It’s super important to practice safe sex using a barrier. Sexual fluids (even if you have been with your partner for many years!) can cause irritation.

Healing Times

Checkup – 4 Weeks

We recommend booking a checkup 2 weeks after your piercing. At this stage, any swelling you have will have come down and you may need a shorter, more snug-fitting barbell. We need your feedback on how much excess barbell is showing when you are fully erect. Please do not get erect at the studio! We recommend taking a measurement at home before your checkup appointment and letting us know roughly how many millimeters you think need to be taken off.

Fully Healed – 2-4 months

After 2-4 months, you can expect your piercing to be fully healed. This is obviously just an estimate, as many things can impact your unique healing journey.

Ready to Stretch – 6+ months

Some people aim to stretch their frenum piercing to a much thicker size. We generally start these piercings at 2.4mm-3.2mm (10g-8g) thick. If you wish to stretch your piercing, you must wait at least 6-8 months before doing so. This allows any scar tissue inside the piercing to heal, soften, and become more elastic. Always contact us and book in for a piercing stretch – Never attempt this at home!

Keep In Contact

Keeping in touch with your studio is so important! We are open 7 days a week and always have an intimate piercing specialist available on the team. If you have any issues with your piercing, any problems or anything isn’t looking quite how you expected, then you are always welcome to contact us or book in for a checkup.

No matter how far along your healing journey you are, we are always there to support you. That’s what makes Rogue such a great studio!

Make sure you follow us on social media.

Posted on Leave a comment

Aftercare 101 – Ampallang and Apadravya Piercings

Ampallang and Apadravya piercings are one of the more common non-standard intimate piercings that we offer. These pass either vertically (Apadravya) or horizontally (Ampallang) through the glans or head of the penis.

Both Ampallang and Apadravya piercings wear 8g or thicker barbells. We start with 6mm or 8mm balls on both ends, however at your checkup and downsize we can sometimes recommend swapping one or both balls to low-profile M&M or Discs. To begin with, the barbell itself can feel long, however at your downsize we can take your feedback and install the best fit for yourself in the long-term.

What To Expect After Your Ampallang/Apadravya Piercing

Bleeding – Ampallang and Apadravya piercings are the intimate piercing that we expect bleeding from the most. You may expect bleeding from the piercing for 5-9 days afterwards. This is totally normal! The most important thing is to keep calm. It will stop on its own. We recommend purchasing a pack of fragrance free sanitary towels to wear to protect your underwear. Please ensure that you are changing them regularly – At least once every 6 hours!

Bleeding is most common first thing in the morning, and after your shower. This is because of your morning erection, and because of the changes in blood pressure during showers. We recommend taking a seat after your shower and gently compressing around the piercing with clean kitchen roll for 2-3 minutes if you notice any excessive bleeding.

Urination – As both Ampallang and Apadravya can pass through the urethra, we recommend over-hydrating for the first few weeks. This means drinking plenty of water! As urine is slightly acidic, it can be a little bit stingy to go to the bathroom for the first couple of days. Staying super hydrated dilutes your urine and makes urinating much more comfortable. It also helps keep the inside of your piercing nice and clean by flushing out any crusties!

Adrenaline – Having a rush of adrenaline is part and parcel of having any piercing, but this rush can be a little bit more intense with intimate work. We always recommend leaving your schedule free for the day of your piercing, so that you can take your time and take any rest you might need. You may feel a little tired or drained afterwards – Make sure to bring a carby, sugary snack and a sugary drink to sip on after your piercing.

Ampallang and Apadravya Cleaning

You need to clean your new piercing 2-3 times a day for the first 2 weeks. We recommend a warm saline soak twice a day – morning and evening, and an optional quick clean at midday with Neilmed saline spray.

To clean your piercings, we recommend a STERILE SALINE SOLUTION. Normally, we would recommend Neilmed specifically, however due to the nature of the piercing and the method of cleaning we advise it wouldn’t be the most effective option. For this piercing, we recommend this type of saline as it is easier to dispense into a cup and is more cost effective. We recommend a warm soak to clean your piercing. This is due to the fact that part of the piercing can be internal inside the urethra, and a warm soak is the best way to soften any crusties on the inside.

To clean your piercing, first wash your hands. Fill a clean cup with enough saline solution to cover your piercing. We recommend warming it in the microwave until it is warm – about bath temperature. Be careful that the saline is not too hot! It should not be uncomfortable!

Once the soak is prepared, soak your piercing in the warm saline for 3-5 minutes. This gives the saline time to soak in, soak up the urethra, and soften any crusting.

Once your soak is complete, you need to wipe away any crusties on the outside of the piercing and the jewellery with some clean paper towel. To flush the inside of your piercing, we recommend urinating immediately after cleaning

At midday, you may want to give the piercing a quick clean if there are any uncomfortable crusties forming on the jewellery. This won’t clean the inside of the piercing, but can help relieve any discomfort. Simply spray a small amount of Neilmed onto the piercing and the jewellery, wait for it to soften any crusties (30-60 seconds), and then gently wipe away any buildup and dab the piercing dry.

If you are experiencing heavier bleeding from your piercing, we recommend not cleaning the piercing for 24-48 hours. You are still highly recommended to shower as normal during this time, however the active soaking and wiping process can reopen the piercing channel and cause you to bleed. Allowing the piercing time to scab and seal over for a day can really help.

Keeping the Piercing Dry

We recommend avoiding soaking and submerging the piercing in still or stagnant water for 4 weeks after getting pierced. This means no swimming in pools or the ocean, bathing in bathtubs, or other water-based activities.

It is highly recommended you shower as normal – Clean running water is a great way to rinse away any buildup in a very gentle way. The only thing to keep in mind is that you want to avoid any harsh or strongly scented shower gels – These can cause irritation.

When you are finished in the shower, it is best practice to dry the piercing site with paper towel. Avoid the area with your bath towel – Snagging the jewellery on a fresh piercing is not fun!

Did you know that a single litre of pool or sea water can contain up to 1 million bacterial cells?

Leave It Alone!

This rule is the cover-all that prevents undue damage to your new piercing.

Clothing, Lifestyle and Bad Habits

  1. Do not touch, fiddle with, or twist the jewellery.
  2. Do not pick at, itch or scratch the piercing!
  3. Wear loose, comfortable underwear and outer clothing. You may want to change your underwear twice a day for the first week to maintain extra cleanliness.
  4. Do not touch your piercing with dirty hands!

Sex and Masturbation

In order to heal well and last a lifetime, it is vital to avoid mistreating your new Ampallang or Apadravya in its first few weeks of life. Even if the piercing feels good and comfortable, it is not fully healed yet! Having sex or masturbating can cause serious damage to the piercing.

Do not have sex or masturbate for at least 4 weeks after getting pierced.

After four weeks, you may feel comfortable and ready to have sex. Please, take it slow. Wash your hands. Wear a condom to prevent sharing body fluids, and listen to your body. If it hurts or is uncomfortable in any way – Stop!

And most importantly… COMMUNICATE WITH YOUR PARTNER(S). What might feel good for you might not feel good for them, and vice versa. Be a considerate partner.

It’s super important to practice safe sex using a barrier. Sexual fluids (even if you have been with your partner for many years!) can cause irritation.

Healing Times

Checkup – 2 Weeks

We recommend booking a checkup 2 weeks after your piercing. At this stage, any swelling you have will have come down and you may need a shorter, more snug-fitting barbell. We need your feedback on how much excess barbell is showing when you are fully erect. Please do not get erect at the studio! We recommend taking a measurement at home before your checkup appointment and letting us know roughly how many millimeters you think need to be taken off.

Fully Healed – 12-18 weeks

After 12-18 weeks, you can expect your piercing to be fully healed. This is obviously just an estimate, as many things can impact your unique healing journey.

Ready to Stretch – 6+ months

Some people aim to stretch their Ampallang or Apadravya to a much thicker size. We generally start both piercings at 8g or 3.mm thick. If you wish to stretch your piercing, you must wait at least 6-8 months before doing so. This allows any scar tissue inside the piercing to heal, soften, and become more elastic. Stretching an Ampallang or Apadravya is quite an intense experience, so please do not attempt to do so at home. Always contact us and book in for a piercing stretch.

Keep In Contact

Keeping in touch with your studio is so important! We are open 7 days a week and always have an intimate piercing specialist available on the team. If you have any issues with your piercing, any problems or anything isn’t looking quite how you expected, then you are always welcome to contact us or book in for a checkup.

No matter how far along your healing journey you are, we are always there to support you. That’s what makes Rogue such a great studio!

Posted on Leave a comment

Aftercare 101 – Christina and Outer Labia Piercings

Although placed in slightly different areas of the vulva, the Christina and Outer Labia piercings have very similar aftercare routines! Both are anatomy dependent, and the appropriate size and style of jewellery differ depending on your unique body. So, what should you expect from the healing process? What Christina aftercare do we recommend?

What To Expect After The Piercing

Bleeding – You may expect bleeding from the piercing for 3-5 days afterwards. This is totally normal! The most important thing is to stay relaxedIt will stop on its own. We recommend purchasing a pack of fragrance free sanitary towels to wear to protect your underwear. Please ensure that you are changing them regularly – At least once every 6 hours!

Urination – We recommend over-hydrating for the first few weeks. This means drinking plenty of water! As urine is slightly acidic, it can be a little bit stingy to go to the bathroom for the first couple of days. Staying super hydrated dilutes your urine and makes urinating much more comfortable. This isn’t as relevant for christina and outer labia piercings, but is still important.

Adrenaline – Having a rush of adrenaline is part and parcel of having any piercing, but this rush can be a little bit more intense with intimate work. We always recommend leaving your schedule free for the day of your piercing, so that you can take your time and take any rest you might need. You may feel a little tired or drained afterwards – Make sure to bring a carby, sugary snack and a sugary drink to sip on after your piercing.

Cleaning

It is super important to keep your new piercing clean, whilst not causing irritation by over-cleaning what is quite a delicate area of your body. Christina aftercare is really easy.

We recommend cleaning twice daily, in the morning and evening. It can be quite handy to tie this in with when you brush your teeth, so that you get a good routine going.

To clean your piercing, first wash your hands. Spray a small amount of Neilmed Saline Aftercare on the entrance and exit points of the piercing. Wait 30 seconds to allow this to fully soak in.

Once any crusties or buildup on the jewellery have softened, gently wipe them away with a clean piece of folded kitchen roll. Be extra gentle during the first 3-5 days, as cleaning too aggressively may cause you to experience a spot of bleeding.

Once you have cleaned the piercing, dry the area to remove any excess moisture.

Keeping the Piercing Dry

We recommend avoiding soaking and submerging the piercing in still or stagnant water for 4 weeks after getting pierced. This means no swimming, bathing in bathtubs, or other water-based activities.

It is highly recommended you shower as normal – Clean running water is a great way to rinse away any buildup in a very gentle way. The only thing to keep in mind is that you want to avoid any harsh or strongly scented shower gels – These can cause irritation. Some people use fragrance-free washes to clean the vulva. You can continue as normal. Just make sure you are rinsing well afterwards to remove any remaining soap suds. We do not recommend douching at any stage!

When you are finished in the shower, it is best practice to dry the piercing site with paper towel. Avoid the area with your bath towel – Snagging the jewellery on a fresh piercing is not fun!

Did you know that a single litre of pool or sea water can contain up to 1 million bacterial cells?

Leave It Alone!

This rule is the cover-all that prevents undue damage to your new piercing.

Clothing, Lifestyle and Bad Habits

  1. Do not touch, fiddle with, or twist the jewellery.
  2. Do not pick at, itch or scratch the piercing!
  3. Wear loose, comfortable underwear and outer clothing. You may want to change your underwear twice a day for the first week to maintain extra cleanliness.
  4. Do not touch your piercing with dirty hands!

Clothing choices are especially important for christina aftercare, where they can interact directly with your clothing. It is vital to wear loose clothing for as long as possible after your piercing – At least 12 weeks. This minimises the chances of snagging your jewellery. Common culprits are lacy thongs, tight belts and skinny jeans!

Sex and Masturbation

In order to heal well and last a lifetime, it is vital to avoid mistreating your new piercing in its first few weeks of life. Even if the piercing feels good and comfortable, it is not fully healed yet! Having sex or masturbating can cause serious damage to the piercing.

Do not have sex or masturbate for at least 4 weeks after getting pierced.

After four weeks, you may feel comfortable and ready to have sex. Please, take it slow. Wear a condom or use a dental dam to prevent sharing body fluids, and listen to your body. If it hurts or is uncomfortable in any way – Stop!

And most importantly… COMMUNICATE WITH YOUR PARTNER(S). What might feel good for you might not feel good for them, and vice versa. Be a considerate partner.

Healing Times

Checkup – 4-6 Weeks

We recommend booking a checkup 2 weeks after your piercing. At this stage, any swelling you have will have come down and you may need a shorter curved barbell. At this stage, we may also like some feedback on the style of jewellery and we can make any adjustments that you think will make the piercing more comfortable! This includes having larger balls, smaller balls, discs, or a mismatch of all of the above. Christina aftercare requires a downsize – Don’t skip it!

Fully Healed – 4-6 months

After 8-12 weeks, you can expect your piercing to be fully healed. This is obviously just an estimate, as many things can impact your unique healing journey.

Ready to Stretch – 8-12 months

Some people aim to stretch their intimate piercings to a larger size. Outer labia piercings are a very popular choice for stretching! We recommend waiting 6 months to allow any scar tissue inside the piercing to heal, soften, and become more elastic. You may even notice that after 6 months, your piercing has naturally stretched and the next size up can simply slot in without any problems at all!

Keep In Contact

Keeping in touch with your studio is so important! We are open 7 days a week and always have an intimate piercing specialist available on the team. If you have any issues with your piercing, any problems or anything isn’t looking quite how you expected, then you are always welcome to contact us or book in for a checkup.

No matter how far along your healing journey you are, we are always there to support you. That’s what makes Rogue such a great studio!

Posted on Leave a comment

Body Jewellery Fitting and Maintenance

At Rogue we offer a fitting service – Any high-quality jewellery can be installed or moved around between your piercings. Simply book in for a checkup appointment with a member of the piercing team. Piercing cleaning is also an easy process that you should know how to do at home.

If you want to know how to look after your fresh piercing, click here to read our full aftercare advice.

The most common question we get is: How does my new jewellery work? How do I change them? How do I look after them? What is piercing cleaning? This blog will go through all the details of how to to each of the above.

The Different Jewellery Styles

It is really important to check the tightness and fit of your jewellery on at least a weekly basis. Even the most secure styles may come loose over time. Find your style of jewellery below and ensure you are tightening them appropriately!

Threadless Jewellery

The most common form of jewellery found at Rogue is threadless jewellery, aka Push-fit jewellery. These are the most straightforward styles to fit at home, and the least fiddly!

Internally Threaded

Our most common style for navels, tongues, cheeks, septums and many other placements. Internally threaded jewellery screws together – Remember: Righty-tighty, lefty-loosey! The video below shows a threaded labret, but all threaded jewellery such as barbells and circular barbells works in an identical manner.

BCR

BCRs are commonly found in daith and septum piercings, but may be used in other placements too.

Seam Rings

Seam rings are a great option for secure, permanent wear in well-healed piercings. These are the trickiest to install at home, so we do highly recommend having these fitted by a pro!

A Note on Changing Jewellery at Home

We always recommend having your jewellery fitted by a trained professional. Not only can changing your jewellery at home cause unnecessary trauma to your piercing if not done smoothly, but an untrained hand can cause serious damage to your jewellery. If you have good experience with handling and changing body piercings, you are at a lower risk of damaging items but this risk is still there.

The most common cause of damage to jewellery is the aggressive use of tools during insertion and removal. This is the main reason why we do not sell or give tools to the public. When used incorrectly, tools can snap threadless pins, pop gems out of their settings, and irreparably scratch delicate jewellery.

It is very important to note that jewellery damaged during home insertions is not covered by any manufacturer warranty or warranty at Rogue. This means that if your jewellery requires repairs such as a pin repair, repolishing, gem resetting or scratch removal, you will need to pay out of pocket or simply purchase a new piece of jewellery. Please do not attempt to fit jewellery at home unless you are confident that you can do so without the use of tools, and without damaging your new jewellery. If you are simply changing a threadless end, this is often absolutely doable at home! However if you are fitting a £2500 Gold-and-Diamond Ring for your wedding… It might be best left to a pro.

Another common cause of issues with at-home insertions is that you may damage the fistula (piercing channel) by being too rough. Especially if you are unfamiliar with body piercings, it can be very easy to be too aggressive when inserting new jewellery at home. This can cause swelling, bleeding, and irritation even to a well-healed piercing. Depending on the client and the piercing, we may sell you an insertion taper to help with insertion of jewellery. We do not do this for everyone as again, a taper is a tool that can easily be misused. Unless you are confident in your ability to change your jewellery, please book in for a checkup and we can do it for you for a very small fee.

If you are purchasing jewellery online, please get in contact with us as we can often recommend a high quality studio near you that can install your new pieces! Please note that some studios may charge a fee for this service.

Solid 18k White Gold Chain Ring from F:LUX Jewellery.

Piercing Maintenance

It is important to look after your jewellery! It is vital for both the security and aesthetic of your piercings that you check on and clean your jewellery, long after your piercing has healed. So how does piercing cleaning work?

Healed Piercing Cleaning

It is very easy to clean a healed piercing. This is a piercing that is 6+ months old, and is completely pain and irritation free. Simply wash with warm water and a mild, fragrance-free facial wash when you are in the shower.

First, run your piercings under the water to dampen them. Piercing cleaning is an easy process. Take your favourite facial wash – We recommend this one – and rub it between your fingers to form a lather. Gently massage the suds in and around your piercings (front and back!) to break up any buildup of oils and skin cells. Massage for 30 seconds to a minute to really allow your piercings to benefit.

Once your piercings have been thoroughly washed, rinse them well with clean water. When you exit the shower, remember to dry your piercings. Either use a lint-free towel or paper towels. Don’t neglect to dry the backs of your ears!

If your ears feel dry after this, you may want to moisturise them with a sparing application of a neutral oil such as Jojoba oil. You can also use a gentle fragrance-free moisturiser if you wish. Keep in mind to avoid any oils or moisturisers near fresh, healing or irritated piercings!

Cleaning Your Jewellery

Throughout your daily life, your piercing jewellery may get dirty. Even with regular showers and cleaning as above, some pieces may need to be removed and cleaned every so often to keep them looking their best.

General Cleaning

Most jewellery, both Titanium and Gold, can be cleaned like this. If you are wearing precious gemstones such as Pearls or other natural stones, please check before you clean as this may damage soft stones. This cleaning method is absolutely fine for Swarovski crystals, synthetic Opals, Topaz, Sapphires and Diamonds.

  1. Gently remove the end from your jewellery. Use one of the guides above if possible! You do not need to remove the wearable shaft. This makes it less likely that you will struggle to reinsert it.
  2. Fill a cup with warm water and a couple of drops of mild dish soap.
  3. Dip your jewellery into the soap mixture, and gently brush the item with a soft toothbrush. Take care to focus on any intricate areas such as the prong setting of most gems.
  4. Once the end is clean, rinse it with clean water (Do not hold it over the drain!) and dry with clean paper towel.
  5. You can now reinstall the end, shiny and clean!

Cleaning Gold Jewellery

As Gold is a precious metal, it can mildly tarnish over time. This can appear as a dulling of the surface, or the appearance of little brassy patches of colour. This is not a cause for concern, and is very easily remedied!

  1. Gently remove the item of jewellery. Use one of the guides above where possible.
  2. Wash the item as described in the ‘General Cleaning’ section above. Ensure the jewellery is dry before continuing.
  3. Take a jewellery polishing cloth (or a soft microfibre cloth as an acceptable substitute) and gently buff the jewellery until it is glossy and very shiny. This may take 1-2 minutes in total per item.
  4. Wipe the item with paper towel to remove any polishing particulates.
  5. Reinstall your newly polished jewellery!