It might seem today like piercings are commonplace on a lot of people, but that is a relatively modern development. Piercings being seen on celebrities has really driven that change so this week we’re going to look at some famous piercing enthusiasts.

Dennis Rodman
Whether it’s his piercings, tattoos or brightly coloured hair, Dennis Rodman always makes an impression. Famous for his time in the NBA playing basketball for the Chicago Bulls, LA Lakers and Detroit Pistons in the late 80’s, 90’s and 2000’s. Noted piercings on Dennis are paired nostrils, labret, earlobes and nipples. His unusual style and attitude made piercings visible to large groups of people who may never have come across them before.

Erykah Badu
Erykah Badu has been called the Queen of Neo-Soul. She is a Singer, Songwriter and Actress. With her main influences being R&B, 70’s soul and 80’s hip-hop. She is just as comfortable on stage as she is in front of the camera and has an unmissable style. As jewellery she has worn many different “fake” piercings but is currently rocking a bridge and some cheek piercings that are a personal favourite of mine. I’ve posted a video below of one of my favourite songs by Erykah.
Scarlett Johansson


Scarlett is a world famous Actress and Singer and is the world’s highest-paid actress since 2018 but she has always had her wild side too. She has always been at the cutting edge of style and this shows in her piercing and jewellery choices too, from her younger days where she had an eyebrow and septum piercing to today where she has a curated ear and enviable jewellery collection. I was unaware that she has a septum piercing before writing this blog and I think that makes her even cooler.
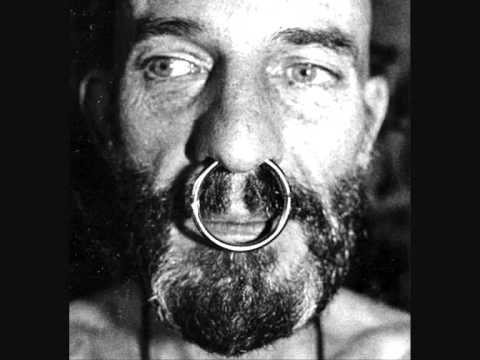
Keith Flint

Braintree’s very own firestarter, Keith Flint was the frontman for the band The Prodigy and brought piercings to every household in the UK in 1996 with the release of the song Firestarter. Famously wearing tongue, septum and various ear piercings, Keith is cited as the reason for many peoples tongue and septum piercings ever since. Sadly Keith took his own life in 2019 but continued to release music upto 2018 and was still a staple of British radio. RIP Keith.
It was fun writing this weeks blog and I could have easily listed many more people and will return to this subject in the future. Thanks for reading everyone!
Aiden